#Auto Battery Connectors
Explore tagged Tumblr posts
Visit Tumblr Blog
Explore Tumblr blogs with no restrictions, modern design and the best experience.
Last Seen Tumblr Blogs


Fun Fact
Tumblr was the first site to host the blog for President Barack Obama in 2011.
Text
Why are so many cars designed to make it almost impossible to replace the headlight bulbs? Even LEDs do not last forever.
The difficult headlight bulb replacement in modern cars stems from several deliberate design trade-offs – prioritizing other factors over serviceability. Here's why engineers often sacrifice accessibility:
Aerodynamics & Styling Demands:
Low, Sloping Hoods: Aggressive aerodynamic profiles minimize the space under the hood, pushing components (including the headlight assemblies) closer to the radiator, engine, and structural elements.
Seamless Body Lines: Sleek headlight designs with complex contours often require integrated bezels and trim pieces that physically block access points. Removing bumpers or entire assemblies becomes necessary to preserve the desired visual lines.
Thin Headlight Profiles: Modern lights are shallow and wrap tightly around body panels, leaving minimal clearance behind the bulb socket.
Overcrowded Engine Bays:
Packing in Tech: Modern engine compartments are packed with turbochargers, intercoolers, complex intake systems, emission control devices, coolant reservoirs, air ducts, battery boxes, fuseboxes, and wiring harnesses.
Prioritized Placement: Engineers give prime, accessible space to critical components like the air filter, oil dipstick, coolant reservoir, and brake fluid. Headlight bulbs become an afterthought, relegated to the cramped spaces left behind.
Complex Headlight Assemblies (Especially for LEDs):
Sealed Units: Most modern LED headlights are not designed with replaceable "bulbs" like halogens. The LEDs are tiny chips soldered onto circuit boards, integrated with heatsinks, lenses, projectors, and complex electronic drivers.
Thermal Management: LED units require effective heat dissipation, often involving large heatsinks and fans inside the sealed assembly. Making them easily serviceable would compromise the thermal seal and design integrity. They are designed as a single, sealed module.
Alignment & Calibration: Modern adaptive headlights (swiveling cornering beams, auto-leveling) require extremely precise optical alignment and electronic calibration from the factory. Replacing an internal LED chip would likely disrupt this precision far more than swapping a simple halogen bulb. Replacing the whole sealed unit ensures this calibration remains intact (it's locked into the housing).
Moisture Seal: Creating a user-serviceable opening for LED chips without compromising the hermetic seal against moisture (which would rapidly destroy the electronics) is extremely difficult.
Safety and Regulatory Concerns:
Accurate Beam Pattern: Headlights must be perfectly aligned to avoid blinding oncoming traffic. A complex mounting system helps ensure the entire headlight assembly remains stable and doesn't get knocked out of alignment easily. Making bulbs "toolless" might compromise this stability.
Electrical Integrity: Complex connectors and wiring harnesses are designed for reliability over the life of the vehicle, not for frequent disconnection/reconnection by owners. Easier access might increase the risk of moisture ingress or connector damage.
Manufacturing Cost, Efficiency & Profit:
Simplified Assembly Line: Designing for easy post-assembly service adds complexity during manufacturing. Mounting the headlight assembly deep within the front end might be faster/easier on the line than leaving room for hand access later.
Dealer Service Profit: While often overstated as the primary reason, manufacturers know difficult repairs increase the likelihood owners will use dealer service departments, where labor rates are high. Making bulbs easy to swap yourself costs them potential revenue.
Reduced Parts Inventory: Designing around sealed LED modules reduces the number of individual parts needed (bulb types, sockets) and simplifies inventory logistics, even though the module itself is more expensive.
Longevity Focus (Even with LEDs):
Perceived Permanence: While LEDs don't last forever, their projected lifespan (often 10,000-15,000 hours+) significantly exceeds the average ownership period of a vehicle (around 8 years). Manufacturers design knowing that most owners won't need to replace them during their ownership, reducing the incentive to prioritize access.
Electronics vs. Filament: Halogen bulbs fail frequently due to fragile filaments. LED modules are solid-state electronics. While the LEDs themselves are long-lasting, drivers/fans/corrosion can cause the entire module to fail before the individual LEDs burn out. It's simpler/necessary to replace the complex module rather than diagnose and repair individual electronic components embedded within it.
In Summary: Engineers are solving a complex puzzle: maximizing aerodynamics, fitting more technology, meeting strict safety regulations, achieving aggressive styling, managing thermal loads (LEDs), ensuring long-term reliability/sealing, and minimizing manufacturing costs/ease. Prioritizing your ability to quickly replace a bulb is rarely high on that list, especially with LEDs designed as long-life, sealed units for performance and reliability reasons. While frustrating for DIY mechanics, the trade-offs made sense to the designers for the other priorities.

#led lights#car lights#led car light#youtube#led auto light#led headlights#led light#led headlight bulbs#ledlighting#young artist#led light bulbs#led strip lights#car rental#cars#electric cars#classic cars#car#carlos sainz#truck#porsche#sabrina carpenter#suv#lamborghini#bmw#autonomous vehicle headlights#overtake another vehicle#older vehicles#very pretty#vehicle#automatic headlights
2 notes
·
View notes
Text
DIY Auto Repairs: Parts Every Car Owner Should Know About
Because sometimes the only thing standing between you and a $500 repair bill is a $30 part and some confidence.
Listen, we've all been there. That moment when your car makes a noise it definitely shouldn't be making, and your stomach drops thinking about how much the repair shop is about to charge you. But here's a little secret from someone who used to be terrified of looking under the hood: many car repairs are actually doable yourself, if you just know the basics.
The Gateway Parts (AKA Your DIY Starter Pack)
Before you dive into the deep end of auto repair, these parts are your beginner-friendly introduction:
Air Filters - Literally just pop open a plastic box, take out the dirty accordion-looking thing, put in the clean one. Shops charge $25+ for this 2-minute job.
Wiper Blades - Those streaky windshield marks aren't just annoying—they're dangerous in heavy rain. Most auto parts stores will even install new ones for free if you buy them there.
Headlight Bulbs - Why pay someone $50 to unscrew a bulb? Most cars take less than 15 minutes to swap these out.
Batteries - With a simple wrench and the ability to tell positive from negative, you can save serious cash here. Pro tip: take a picture of the connections before disconnecting anything.
The Money-Saving Middle Ground
Ready to level up? These parts might seem intimidating at first, but they're actually pretty manageable:
Brake Pads - I'm not saying brake work is super easy, but it's mostly just removing wheels, unscrewing a few things, and putting new pads where the worn ones were. The satisfaction of doing this yourself is chef's kiss.
Spark Plugs - With a special socket and a little patience, you can bring your engine back to life when it's running rough. Just replace one at a time so you don't mix up the wires.
Oil and Filter - Yes, getting under the car is involved, but a basic oil change is basically "unscrew plug, drain goop, replace filter, add new goop." The first time takes an hour, but you'll get it down to 20 minutes eventually.
Sensors - Modern cars have sensors for EVERYTHING. Oxygen sensors, mass airflow sensors, coolant temp sensors... they can cost hundreds to replace at shops, but often they're just a connector and a bolt.
The "Proceed With Caution" Parts
These repairs can save you serious money but require more research and patience:
Alternator - This electricity-generating wizard isn't actually that complicated to replace, but it can be buried in an annoying location depending on your car model.
Starter - When your car won't start and makes a clicking noise, this is often the culprit. Replacing it is often just a matter of disconnecting the battery, removing a few bolts, and swapping in a new one.
Thermostat - This little temperature-regulating valve is responsible for a surprising number of overheating issues. Replacing it can be messy (coolant everywhere!) but not difficult.
Fuel Pump - Located in your gas tank, this isn't the most convenient part to reach, but if you're facing a $700 repair bill, suddenly dropping your gas tank doesn't seem so bad.
Resources That Won't Make Your Eyes Glaze Over
YouTube Channels Worth Your Time:
ChrisFix (seriously, this guy explains things better than most college professors)
Scotty Kilmer (opinionated but incredibly knowledgeable)
EricTheCarGuy (detailed walkthroughs for common repairs)
Apps That Actually Help:
Repair Pal (get fair estimates before you start)
Torque Pro (connects to your car's computer to tell you what's wrong)
Car Parts (compare prices across different stores)
The Parts You Should Leave to the Pros
Sometimes, DIY isn't worth it. Here's when to wave the white flag:
Anything involving the airbag system (unless you enjoy danger)
Timing belt/chain replacement (one tiny mistake = engine death)
Transmission rebuilds (just... no)
Engine mounts (awkward angles + supporting engine weight = potential disaster)
Parting Thoughts (See What I Did There?)
The auto repair industry has an incentive to keep you intimidated and dependent. But with a repair manual, some basic tools, and the confidence to try, you'd be amazed what you can fix on your own.
The first time I changed my own brake pads, I saved $220 and gained something more valuable: the knowledge that I could figure things out myself. Now my go-to response to car trouble isn't panic—it's curiosity.
What auto repair are you most intimidated by? Drop a comment below and maybe we can demystify it together.
#CarRepair #DIY #AutoParts #SaveMoney #CarMaintenace #CarTips #Automotive

#auto parts and accessories#auto parts store#autopart#autopartsbusiness#autopartscatalog#autopartssales
2 notes
·
View notes
Text
Single Channel Electronic Pipette MPA-10000
Sagartexbd Single Channel Electronic Pipette MPA-10000 feel shockingly lightweight with a brought down center of gravity and compact plan. The MPA Arrangement is worked with a tall exactness venturing engine and too liberates clients from costly outside calibration administrations with straightforward calibration capacities (for both volume and weight) which can be performed in-house. With these highlights clients can be guaranteed of reliable, solid comes about and realize uniform pipette operation for both amateur and master alike.
The plunger of the Single Channel Electronic Pipette is controlled by gently squeezing a key with the ball of the pointer (like pulling a trigger), whereas keeping up all fingers in a normal, easy hold. No longer will hours or days of pipetting cause torment in your thumb.

Features of Single Channel Electronic Pipette MPA-10000
Accuracy/repeatability not subordinate on human factors
Stress-minimized, pain-free operation utilizing the forefinger
Easy calibration (alteration) with the Client CAL function*1*2
Calibration and show by either volume (µL/mL) or weight (mg)*1
Accurate pipetting conceivable with other manufacturers’ tips
Dedicated glass tips and silicon connectors available
Multiple apportioning (MD) mode with programmed starting volume adjustment (pre-dispensing)
Mixing (Blend) mode for homogenizing solutions
Reverse operation for precisely apportioning gooey samples
Increased resistance to drop impacts with cushioning on the head*1
Aspirating and apportioning speeds flexible to 5 diverse levels each
Storage for up to 9 programs
High resistance to acid/organic solvents
Quickly separable, autoclavable lower portion (121 deg C, 2 atm, 20 minutes)
Adjustable tip ejector reach
Extended finger hook
Power supply by either a rechargeable battery or exchanging (100-240V) AC adapter
Multiple AC connector plugs (A, BF, C, S)
Auto control OFF function
Specifications
Capacity Range: 0.1 to 10 ml
Lithium- ion rechargeable battery
Adapters (UBX310052-10ML)
Tipes- 1 Pcs
2 notes
·
View notes
Text
What Industries Is Injection Molding(Moulding) Applicable To?
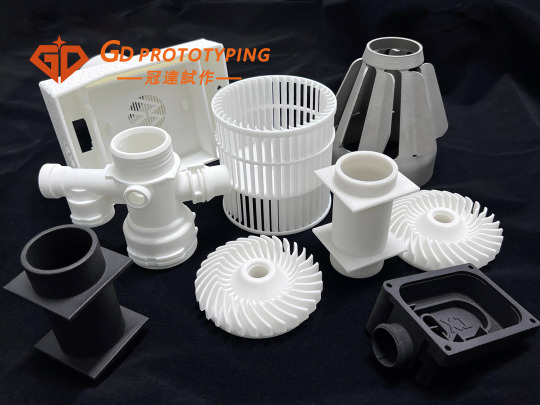
Injection moulding is a common manufacturing process by injecting molten plastic material into a mould so that it can be formed into the desired product shape upon cooling.
Injection moulding process has the advantages of low cost, high production efficiency and stable product quality to make it widely used in various industries. In this vast injection moulding market, there are three industries are particularly eye-catching, which are extensively used for production and manufacturing due to their specific needs and product characteristics.
1.Household Appliance Manufacturing Industry
As an indispensable part of people's daily life, the market demand for household appliances is stable and continuously growing. The injection moulding process plays a pivotal role in the manufacturing of household appliances, from the outer shell to the internal components, injection moulding technology provides key support. Most of the exterior and structural components of home appliances, such as TV remote controls, refrigerators, TV sets, air-conditioning panels, and washing machine shells, are manufactured by injection molding process.
2.Automotive Components Industry & Transportation Sector
With the booming development of the automotive industry, the auto components and parts market has ushered in unprecedented development opportunities. Components and parts such as automotive dashboards, door interior panels, bumpers, and lamp housings as well as a wide range of pipework and connections are made through the injection moulding process. These parts require not only high precision and good mechanical properties, but also need to meet the strict appearance requirements, which injection moulding process is precisely by virtue of its unique advantages, in this field to occupy a place. In addition, with the rise of new energy vehicles, injection moulded parts play an important role in the manufacturing of key components such as battery packs and motor housings.
3.Medical Device Industry
With the increasing emphasis on health, the market demand for medical devices continues to grow. In medical device manufacturing, the injection moulding process is used to produce disposable medical devices such as syringes, infusion tubes and surgical instruments. These products require strict quality control and hygiene standards, and injection moulding process ensures product safety and effectiveness.
In addition, the injection moulding process is also widely used in the electrical and electronic industry, consumer electronics, packaging industry, toy manufacturing, construction materials, industrial parts, furniture and household furnishings and agriculture, among many others.
4.Electrical & Electronic Industry
In the manufacturing process of electronic products, many components such as housings, cases, sockets, connectors, cables, switches and holders for electronic circuit boards need to be manufactured by injection moulding process. Injection moulding process can achieve precise control of product appearance, size and structure, to meet the requirements of electronic products for appearance quality, functionality and reliability.
5.Consumer Electronics Industry
In the electronics industry, injection moulded parts are equally widely used. From mobile phone housings, computer components including keyboards and mice to remote controls and battery cases, the injection moulding process offers a wide variety of appearance and structure options for electronic products. These components not only need to have good mechanical properties and appearance, but also need to have excellent electrical insulation properties to ensure the stable operation of electronic products. Injection moulding technology occupies an important position in the manufacture of electronic products due to its advantages of high precision and low cost.
6.Construction Sector
In the construction field, injection moulded parts also have a wide range of applications, the drainage systems, door and window frames, pvc pipes, valves, wire troughs, insulation materials and other construction materials and accessories are mostly manufactured by injection moulding process. These components are not only high-strength and corrosion-resistant, but also weather-resistant and easy to install, meeting the construction industry's requirements for material performance and ease of use and improve construction efficiency and aesthetics. The application of injection moulding technology in the construction field not only improves the performance and quality of construction materials, but also promotes the sustainable development of the construction industry.
7.Packaging Industry
The packaging and container industry is also one of the key application areas for injection moulding processes. Plastic bottles, food boxes, cosmetic bottles, plastic bags and other packaging containers are mostly manufactured by injection moulding process to meet food safety and aesthetic requirements. These containers need to be well-sealed, drop-resistant, retain freshness and recyclable to ensure that the products are safe and environmentally friendly. Injection moulding processes can offer flexible design and manufacturing options to adapt to different packaging needs and provide strong support for the development of the packaging industry.
These areas above are just a few examples of the application areas of the injection moulding process. In the toy industry, injection moulded parts are used to manufacture a variety of plastic toys; In the textile and clothing industry, injection moulded parts are used to manufacture accessories such as zips and buttons; In the agricultural sector, injection moulded parts are used to manufacture agricultural tools and equipment such as sprayers and watering cans; Even in the aerospace sector, injection moulded parts are also used to manufacture parts for aircraft and spacecraft. It can be said that injection moulded parts have penetrated into almost every corner of our life.
In summary, injection moulded parts play an important role in several industries by virtue of their high precision, low cost and wide applicability. The application of injection moulding process in these areas not only improves production efficiency, but also meets the needs of product diversification and individualisation. With the continuous progress of science and technology and the continuous improvement of people's requirements on product quality, injection moulding technology will continue to be widely used and developed in various fields.
#design#autos#business#prototyping#prototype#prototype machining#rapid prototyping#cnc machining#precision machining#machining parts#injection molding#plastic injection molding#injection moulding machine#injection moulding#plastic injection#injection molded#injection molding parts#injection molded parts
2 notes
·
View notes
Text


During multi-day adventures, devices like your phone, GPS, headlamp or headset can make time out in the wilderness safer and even more memorable but recharging them once you reach camp comes with the risk of draining your bike’s battery beyond its capacity to start your motorcycle the next day. One device that helps diminish that risk is the Optimate USB O-100. It plugs into any SAE (battery tender) connector and converts your battery’s precious juice into useful USB power. Plus with a direct battery connection, it’s always on with no need to key the ignition. What’s unique though is this smart device’s ability to monitor the voltage of your bike’s battery while charging devices. If the battery drops below 12.4 Volts it will automatically turn off, ensuring you’ll have plenty of power to restart your journey the next day. There’s also a built-in charge monitor that lets you check your battery’s health at a glance, plus an auto shutoff feature cuts power to the USB port if it’s not in use for an hour to avoid any parasitic drain. Optimate offers a number of different solutions for both standard USB and USB-C power ports and they work with either Lead-Acid, AGM or Lithium-ion batteries. More details at bit.ly/motousb
#dualsport#adventure bike#adventure touring#motorcycle#adventure motorcycle#adventuremotorcycle#adventurebike#dual sport#advmoto#battery charger
2 notes
·
View notes
Text

Is your iPhone screen flickering, freezing, or showing weird lines? Whether it’s ghost touches or apps opening on their own, a glitching iPhone screen can mess up your entire day. But here’s the good news you don’t have to panic or replace your iPhone just yet.
Your trusted iPhone repair expert in Lower Hutt, Phonefixer, fixes many iPhone screen issues every month and yes, many of them are fixable in minutes! In this easy guide, we’ll walk you through:
Why your iPhone screen is glitching
8 easy ways to fix it at home
When it’s time to search for fix iPhone screen near me Lower Hutt
What Does a Glitching iPhone Screen Look Like?
Before diving into solutions, let’s understand what a glitching screen means. You may notice:
Screen flickering (brightness going up and down)
Touch not responding correctly
Horizontal or vertical lines
Screen turning black or white randomly
Apps opening on their own (ghost touch)
These are common signs of a glitching screen.
Why is My iPhone Screen Glitching?
There are several reasons why your iPhone screen may act weird. Here are the most common causes:
1. Software Bugs
iOS updates sometimes have bugs that cause the screen to flicker or freeze.
2. App Issues
A poorly coded or outdated app can cause the screen to glitch when you open or use it.
3. Low Storage
If your phone storage is nearly full, it can slow down your iPhone and cause display problems.
4. Overheating
Using your phone in direct sunlight or while charging for long hours can overheat the device, causing screen glitches.
5. Water or Moisture Damage
Even a small amount of water inside your iPhone can damage the display.
6. Hardware Issues
If you recently dropped your iPhone or it suffered an impact, internal parts like the screen connector or display panel may be damaged.
7. Battery Issues
An old or faulty battery can affect overall performance, including screen responsiveness.
8 Simple Solutions to Fix a Glitching iPhone Screen
Let’s fix the glitching screen step-by-step with these tried and tested methods.
1. Restart Your iPhone
It sounds simple, but a restart can solve many temporary software glitches.
How to do it:
Press and hold the side button + volume button until the power off slider appears.
Slide to power off, then turn it on after 30 seconds.
2. Update iOS Software
Apple often fixes bugs in newer iOS updates.
Steps:
Go to Settings > General > Software Update
Download and install any available update
3. Remove Problematic Apps
Notice your screen glitching only when using a particular app? That app might be the problem.
What to do:
Uninstall or update the app from the App Store
Restart your iPhone to see if the issue goes away
4. Turn Off Auto Brightness
Auto brightness can sometimes cause flickering issues.
Steps:
Go to Settings > Accessibility > Display & Text Size
Turn off Auto-Brightness
5. Free Up Storage Space
Clear out unnecessary files, photos, or unused apps.
Tips:
Use iCloud to back up photos
Delete apps you don’t use
Clear Safari history and website data
6. Check for Moisture or Water
If you suspect water damage:
Turn off the iPhone immediately
Don’t charge it
Keep it in a dry area or a bag of uncooked rice for 24-48 hours
But be careful! Water damage needs expert help. If you’re near the lower hutt, it’s best to search for fix iPhone screen near me Lower Hutt and get professional service from Phonefixer.
7. Replace the Battery (if old)
An old battery can affect the screen’s performance.
Signs you need a new battery:
iPhone heats up fast
Battery drains quickly
iPhone shuts down randomly
You can check your battery health under Settings > Battery > Battery Health & Charging.
8. Visit a Phone Repair Expert
If none of the above solutions work, your iPhone may have hardware damage. Don’t try to open your iPhone yourself, it can cause more damage. Look for professional help by searching “fix iPhone screen near me Lower Hutt“ online. If you’re in Lower Hutt, Phonefixer offers reliable and quick repairs for glitching screens and other phone issues.
Pro Tips to Avoid iPhone Screen Glitches in the Future
Always keep your iOS updated.
Don’t overload your iPhone with too many apps.
Use a screen guard to prevent physical damage.
Avoid using your phone while charging.
Don’t expose your iPhone to heat, water, or strong magnets.
When Should You Visit Phonefixer?
If your iPhone screen:
Keeps flickering after restarting
Doesn’t respond to touch
Has lines or black spots
Has suffered a drop or water exposure
Then it’s time to get professional help.
What Makes Phonefixer the Most Trusted iPhone Repair Shop in Lower Hutt
Certified technicians
Fast service
Affordable prices
So, next time your screen glitches, don’t panic. Whether it’s a software bug or a hardware fault, Phonefixer has got your back. Save time and get peace of mind with expert help right around the corner.
Conclusion
A glitching iPhone screen is annoying, but it’s not the end of the iPhone. Try the 8 easy solutions mentioned above to see if you can fix it yourself. And if not, search fix iPhone screen near me Lower Hutt and bring your iPhone to Phonefixer for a professional check-up.
Stay calm, stay smart, and let the screen shine
0 notes
Text
Price: [price_with_discount] (as of [price_update_date] - Details) [ad_1] Product Description Powerful mini tyre inflator, max. 150 PSI (10.3 bar): size of the portable air compressor (17 x 6.9 x 5 cm), only 598 g. Rechargeable built-in battery: 3 x 2000 mAh. Equipped with Type-C connector and charging cable for the car, which can be charged conveniently and quickly. that you can easily inflate all small cars (only for small cars), bicycles, motorcycle tyres, swimming rings, inflatable toys and other inflatable products within minutes. DC 12 V or battery-operated air compressor: compared to other portable air pumps that only support battery power, means that you can only use the tyre pump when it is full of power. But we have solved these design errors, when the wireless air pump is off, you can connect it to the cigarette lighter of the car for power and inflate your car tyres directly (please keep your car engien is on), it is a really emergency tyre pump. ⭐This portable air compressor can be used as a power bank: it has a USB port that provides you with a power bank function to charge your smartphone in case of emergency. It also comes with a durable nylon bag in which you can conveniently store and transport the inflator. A great gift choice for your friends and family. A best friend when travelling. ⭐Auto-stop and built-in memory function: 4 optional units of PSI, BAR, KPA, Kg/cm2. When the filling volume reaches the preset value, the pump automatically shuts off to avoid overblowing. (Please set the pressure value first. Note: Click the "Loop button" to select the desired mode. Hold the "loop button" to select the desired unit.) This air pump automatically stores your last preset pressure value. ⭐Tyre Inflator with Digital Pressure Gauge and Light: This digital air compressor tyre inflator has a bright LCD screen. You can easily use the tyre pump even in the dark. This wireless tyre inflator also has an SOS and lighting function to assist you in emergency situations. We offer 24-hour customer service. If you find anything wrong, you can contact us at any time on your order detail page "Contact Seller". [ad_2]
0 notes
Text
Just had a fun convo with a friend and now I feel compelled to make a post. If you're gonna smoke 510 THC cartridges I would suggest not getting those auto-draw batteries that work just by inhaling. After a while you gotta start sucking air in like a motherfucker to get it to work. If possible get one that works by pressing a button. It'll save you trouble. I would personally recommend a Yocan Uni Pro if you don't mind the risk of losing the magnetic connector.
0 notes
Text
Price computing scale auto power off from a trader wandegeya
ACCURATE WEIGHING SCALES PRICE COMPUTING DOCUMENTS
Price computing machines are an excellent option as Accurate Weighing Scales for both large and small capacity Accurate Weighing Scales. The versatility and accuracy of our products ensures that our diverse customers can find a suitable unit to meet the growing needs of their business. We also offer high quality, reliable scale services and repairs to keep you moving. If you’re looking for a lightweight and portable price-computing retail scale for your shop or restaurant, Accurate Weighing Scales has the answer. We now offer new dual-range price computing scale, ideal for retail weighing and price computing tasks in a variety of commercial settings.
The features of our Price Computing Scales are that they are sleek with a sturdy exterior that brings an aura of elegance to retail counters. With ABS plastic housing, the weight measuring scale is lightweight and durable enough to endure the demands of any retail establishment where pricing is based on weight. A large, stainless steel pan is adequately sized to hold a variety of food and containers used in take-away restaurants. To maintain tidiness, the pan removes easily to allow speedy and thorough cleaning between transactions. This is important, as food retailers must adhere to health and hygiene guidelines. The sealed keypad keeps out dirt and spills encountered during use. Perfect for farmer’s market or roadside produce stands, they work with AC connector or battery, so they can work even where power isn’t accessible. Rubber feet offer dependability on work areas, tables, counter or unsteady surfaces, bringing about steady and exact readings.
Price computing scales are trade approved and can be used for weighing products that are intended to be sold by weight.
Thank you for allowing Accurate Weighing Scales (U) Ltd the privilege to serve you in advance. For inquiries on deliveries contact us Office +256 (0) 705 577 823, +256 (0) 775 259 917 Address: Wandegeya KCCA Market South Wing, 2nd Floor Room SSF 036 Email: [email protected]

0 notes
Text
What can I do to fix (Myself) a 2011 Nissan Headlights with a dimming problem: the right headlight is dim but the left headlight is extra dim?
To address the dimming issue in your 2011 Nissan's headlights, follow this structured approach to diagnose and resolve the problem:
Step-by-Step Solution
1. Inspect and Replace Bulbs
Check Both Bulbs: Remove and inspect them for blackening, filament damage, or aging.
Swap Bulbs: Temporarily swap the left and right bulbs. If the dimness moves to the right, the original left bulb is faulty. Replace both bulbs with new OEM-spec bulbs (e.g., H11 or 9005, as per your manual).
Avoid Touching Glass: Use gloves when handling halogen bulbs to prevent oil residue from shortening their lifespan.
2. Clean Electrical Connections
Unplug Headlight Connectors: Look for corrosion (green/white residue) or melted plastic.
Clean Contacts: Use electrical contact cleaner and a small wire brush. Apply dielectric grease to prevent future corrosion.
Inspect Wiring: Check for frayed, cracked, or damaged wires near the connectors. Repair with heat-shrink tubing or replace the harness if needed.
3. Check Ground Connections
Locate Ground Points: Typically bolted to the chassis near the headlights (refer to your manual for exact locations).
Clean and Tighten: Remove the ground bolts, scrub the contact area with sandpaper or a wire brush, and re-secure tightly.
4. Test Voltage at Headlights
Multimeter Setup: Set to DC voltage (20V range).
Test with Lights On:
Engine off: Battery should read ~12.6V.
Engine running: Alternator should output 13.5–14.5V.
Measure voltage at the headlight connectors (with bulbs installed). If below 12V, there’s a voltage drop.
Compare Sides: If the left side shows significantly lower voltage than the right, focus on its wiring/ground.
5. Inspect Fuses and Relays
Check Fuses: Locate the headlight fuse in the fuse box (often labeled "HEAD" or "LOW BEAM"). Test continuity with a multimeter. Replace if blown.
Test Relays: Swap the headlight relay with an identical one (e.g., horn relay) to rule out a faulty relay.
6. Evaluate Alternator Health
Voltage Test: With the engine running, measure voltage at the battery terminals. If below 13.5V, the alternator may be failing.
Professional Help: If the alternator is suspect, have it tested at an auto parts store or by a mechanic.
7. Address Wiring Issues
Voltage Drop Test: Check for resistance in the power and ground circuits. A drop >0.5V indicates a problem.
Repair Damaged Wiring: Replace corroded or broken wires. Use automotive-grade wire and solder/heat-shrink connectors.
8. Check Headlight Switch/Dimmer
Test Switch Function: If voltage drops persist, the headlight switch or dimmer module may be faulty. Consult a wiring diagram for your Nissan to test switch output.
Replace if Necessary: Switches are typically behind the steering wheel or dashboard and may require partial disassembly.
Common Fixes by Symptom
Both Bulbs Dim:
Faulty alternator or weak battery.
Corroded ground/power connections shared by both headlights.
Left Extra Dim:
Poor left-side ground or corroded connector.
Damaged wiring specific to the left headlight.
Tools Needed
Multimeter
Screwdriver set
Wire brush/sandpaper
Electrical contact cleaner & dielectric grease
Replacement bulbs (OEM part number)
Final Tips
Avoid Cheap Bulbs: Low-quality aftermarket bulbs often fail prematurely or cause electrical issues.
Professional Help: If wiring repairs or alternator replacement are needed and you’re unsure, consult a mechanic.
By methodically testing components, you’ll likely resolve the dimming issue and restore safe nighttime visibility!

#led lights#car lights#led car light#youtube#led auto light#led headlights#led light#led headlight bulbs#ledlighting#young artist#american cars#cars#car culture#classic cars#car#car light#vehicle#auto#suv#vintage car#headlight bulb#headlamp#headlight#lamp#car lamp#2011 Nissan#nissan#automotive
2 notes
·
View notes
Text
What Is Vehicle Scanning and Why Do You Need It?

Vehicle scanning is a process that checks your car’s internal systems using digital tools. It connects to your vehicle’s onboard computer—also known as the OBD (on-board diagnostics) system—and reads fault codes or alerts that may not be visible on the surface. You don’t need to be a mechanic to understand how valuable this is. Just like a doctor’s check-up finds hidden health issues, a vehicle scan helps detect problems inside your car before they turn into major faults.
What systems get scanned?
A vehicle scan covers a wide range of essential systems. This includes the engine, transmission, electrical components, airbags, brake sensors, exhaust systems, and even air conditioning. It can also spot issues with your car’s battery, which ties into other services like car battery repair near me that many drivers often search for when something goes wrong. Whether it’s a dashboard warning light or unusual engine behavior, scanning provides the first clue toward fixing the problem.
Why Is Vehicle Scanning a Key Part of Car Care?
A simple scan can save you serious trouble later
Many car issues begin quietly. You might not notice anything wrong until the engine stalls, the brakes feel weak, or warning lights start flashing. But with regular vehicle scanning, you don’t have to wait until things get worse. A quick scan can reveal hidden faults long before they cause breakdowns or expensive repairs.
It fits perfectly into your car care routine
When you take Car Care seriously, scanning should be part of your checklist. It keeps your vehicle in top shape and improves safety for you and your passengers. Many modern garages now include basic diagnostics in a car service, so it’s easy to ask for a scan during your regular visits. Most importantly, it helps you plan ahead—by catching minor issues early, you can fix them before they become costly problems.
What Tools Are Used for Vehicle Scanning?

The scanners behind the scenes
There are two main tools that mechanics use for vehicle scanning: handheld diagnostic devices and auto current scanners. These tools plug into your car’s OBD port, usually located near the dashboard or steering wheel. Once connected, they run a scan of the car’s internal systems and report back with error codes or system statuses.
How scanners work with different systems
Auto current scanners are particularly useful when checking electrical circuits and current flow, especially for problems like faulty sensors, weak batteries, or loose wiring. On the other hand, OBD2 scanners are often used to detect engine and emission-related issues. Both tools provide fast, accurate results and help technicians figure out what needs fixing—whether it’s your ignition system or something as simple as a loose connector. So if you’re getting a car service, ask whether vehicle scanning is included—it’s a smart way to stay ahead of any surprise issues.
What Types of Problems Can a Vehicle Scan Detect?
From tiny faults to serious issues
Vehicle scanning isn’t just about checking what’s under the bonnet—it looks deep into your car’s systems. A scan can detect issues with sensors, engine timing, emissions, and even your battery’s performance. It can flag something as simple as a loose fuel cap or as serious as a misfiring engine.
If you've ever searched for car battery repair near me, it’s likely because of a slow start or a warning light. Many times, these issues can be traced back to battery voltage, alternator faults, or hidden wiring problems—all of which can be picked up by a scan.
Why early detection matters
Even a small fault can reduce fuel efficiency or wear out your engine faster. By using scanning tools to catch issues early, you can avoid bigger repair costs and drive more confidently. Whether it's low coolant signals or brake sensor failures, a vehicle scan helps you stay on top of problems before they affect your safety or your wallet.
When Should You Book a Vehicle Scan?

Don’t wait for warning lights to come on
While dashboard lights are obvious clues, many problems start quietly. That’s why it’s smart to include vehicle scanning as part of your regular car service—even if you don’t think anything’s wrong. Most workshops in Sydney and beyond now offer scans as part of their maintenance checks.
Scans are also important before long road trips or if you’ve recently bought a used car. It gives you peace of mind and can reveal issues the seller didn’t mention.
Common signs you need a scan
Your check engine light is on
You notice strange sounds or smells
Your car feels sluggish or vibrates
Fuel usage suddenly increases These are signs it’s time to ask for a scan—and possibly look into other related services like car battery repair near me if battery faults are involved.
Can You Scan a Car at Home or Should You Visit a Pro?
DIY tools are handy, but pros offer more insight
Some car owners buy small OBD2 scanners for personal use. These tools can read basic error codes and are useful for quick checks at home. However, if you want a full picture of your vehicle’s health, professional tools like auto current scanners give a deeper and more accurate reading.
Why a professional scan is worth it
Most car care shops use commercial-grade scanning systems that can access more detailed data from your car’s computer. These scanners are updated regularly and can read brand-specific codes that basic home tools can’t. Many local garages—even those offering car battery repair near me—include scanning as a free or low-cost service with diagnostics.
Final Tips: Add Vehicle Scanning to Your Car Care Routine

Make scanning a habit, not a last resort
Vehicle scans aren’t just for when something goes wrong—they’re a smart way to stay ahead. Add it to your regular Car Care plan and ask for it during every car service. It’s quick, affordable, and can reveal problems you might not even notice.
Proactive car care saves you money and stress
From detecting hidden faults to supporting battery health, regular vehicle scanning is one of the best ways to keep your car running smoothly. It helps you make informed decisions, avoid surprise breakdowns, and drive with confidence—all while extending the life of your vehicle.
1 note
·
View note
Link
0 notes
Text
Price computing scale auto power off from a trader wandegeya
ACCURATE WEIGHING SCALES PRICE COMPUTING DOCUMENTS
Price computing machines are an excellent option as Accurate Weighing Scales for both large and small capacity Accurate Weighing Scales. The versatility and accuracy of our products ensures that our diverse customers can find a suitable unit to meet the growing needs of their business. We also offer high quality, reliable scale services and repairs to keep you moving. If you’re looking for a lightweight and portable price-computing retail scale for your shop or restaurant, Accurate Weighing Scales has the answer. We now offer new dual-range price computing scale, ideal for retail weighing and price computing tasks in a variety of commercial settings.
The features of our Price Computing Scales are that they are sleek with a sturdy exterior that brings an aura of elegance to retail counters. With ABS plastic housing, the weight measuring scale is lightweight and durable enough to endure the demands of any retail establishment where pricing is based on weight. A large, stainless steel pan is adequately sized to hold a variety of food and containers used in take-away restaurants. To maintain tidiness, the pan removes easily to allow speedy and thorough cleaning between transactions. This is important, as food retailers must adhere to health and hygiene guidelines. The sealed keypad keeps out dirt and spills encountered during use. Perfect for farmer’s market or roadside produce stands, they work with AC connector or battery, so they can work even where power isn’t accessible. Rubber feet offer dependability on work areas, tables, counter or unsteady surfaces, bringing about steady and exact readings.
Price computing scales are trade approved and can be used for weighing products that are intended to be sold by weight.
Thank you for allowing Accurate Weighing Scales (U) Ltd the privilege to serve you in advance. For inquiries on deliveries contact us Office +256 (0) 705 577 823, +256 (0) 775 259 917 Address: Wandegeya KCCA Market South Wing, 2nd Floor Room SSF 036 Email: [email protected]

#waterproof scales#counter scales#baby scales#whole sale scales#bathroom scales#mini palm scales#kitchen scales#health ( height and weight ) scales#fish scales#animal scales
0 notes
Photo

Dell Latitude 2120 Intel Atom 2GB Ram 250GB SATA HDD Dell Latitude 2120 Specifications Display Diagonal Size: 10.1" Resolution: 1024x600 (WSVGA) Technology: Anti-glare LED-backlit Diagonal Size: 10.1" Resolution: 1366x768 (HD) Technology: Anti-glare LED-backlit /Anti-glare LED-backlit with Multi-Touch Graphics Card Intel® Graphics Media Accelerator 3150 Intel® GMA w/ Broadcom Crystal HD Media Accelerator Processor Type: Intel® Atom™ N550 Dual Core processor Speed: 1.5 GHz Cache: 1 MB L2 Type: Intel® Atom™ N455 processor Speed: 1.66 GHz Cache: 512 KB L2 Chipset Intel® NM10 Memory Up to 2GB DDR3 SDRAM at 1333Mhz - 1 DIMMS Storage Up to 320GB hard drive (7200rpm) Up to 250GB hard drive (5400rpm) Optical Drive External USB DVD+/-RW Mobile Broadband & GPS Options: • Dell Wireless™ 5630 Multi-mode HSPA-EVDO Mini Card (Gobi™ 3000) with A-GPS. (US & China only) • Dell Wireless™ 5550 Single-mode HSPA Mini Card with A-GPS. Communication LAN: 10/100/1000 Gigabit Ethernet WLAN: • Broadcom BGN (802.11 b/g/n 1x1) • Broadcom AGN (802.11 a/g/n 2x2) • Intel® Centrino® Advanced -N + WiMAX 6250 Bluetooth: Dell Wireless 375 Bluetooth® 3.0 Inputs and Controls Keyboard • Standard Keyboard • Tamper-resistant keyboard design with anti-microbial protection (optional) Multi-Touch Screen (HD panel only) Audio Headphone/Microphone jack Interface 1 x Network connector (RJ-45) 3 x USB 2.0 ports 1 x VGA Stereo headphone/Microphone combo jack Slots Card Reader: 3-in-1 card reader 1 Full and 1 Half Mini Card Slot Camera Yes (optional) Power Battery: • 3-cell Li-ion (28 Wh) with ExpressCharge™ • 6-cell Li-ion (56 Wh) with ExpressCharge™ • 6-cell Li-ion (54 Wh) 3 Year Warranty (will be available in April 2011) 65 Watt AC Adapter 90W Auto/Air DC adapter (optional) Security Dual Kensington lock slots Dimensions and Weight Width: 26.5 cm (10.43") Depth: 18.7 cm (7.36") Height: 2.25 - 3.99 cm (0.89 - 1.57") Weight: 1.31 kg (2.90lbs) (with 3-cell battery) Recommended Operating Systems: Ubuntu® 10_10 Windows® XP/7/8 MANUAL: https://www.dell.com/downloads/global/products/latit/en/latitude_2120_spec_sheet_business.pdf PRODUCT PAGE: http://www.dell.com/pk/business/p/latitude-2120/pd
0 notes
Text
Glitching iPhone Screen: Causes + 8 Simple Solutions
Is your iPhone screen flickering, freezing, or showing weird lines? Whether it’s ghost touches or apps opening on their own, a glitching iPhone screen can mess up your entire day. But here’s the good news you don’t have to panic or replace your iPhone just yet.
Your trusted iPhone repair expert in Lower Hutt, Phonefixer, fixes many iPhone screen issues every month and yes, many of them are fixable in minutes! In this easy guide, we’ll walk you through:
Why your iPhone screen is glitching
8 easy ways to fix it at home
When it’s time to search for fix iPhone screen near me Lower Hutt
What Does a Glitching iPhone Screen Look Like?
Before diving into solutions, let’s understand what a glitching screen means. You may notice:
Screen flickering (brightness going up and down)
Touch not responding correctly
Horizontal or vertical lines
Screen turning black or white randomly
Apps opening on their own (ghost touch)
These are common signs of a glitching screen.
Why is My iPhone Screen Glitching?
There are several reasons why your iPhone screen may act weird. Here are the most common causes:
1. Software Bugs
iOS updates sometimes have bugs that cause the screen to flicker or freeze.
2. App Issues
A poorly coded or outdated app can cause the screen to glitch when you open or use it.
3. Low Storage
If your phone storage is nearly full, it can slow down your iPhone and cause display problems.
4. Overheating
Using your phone in direct sunlight or while charging for long hours can overheat the device, causing screen glitches.
5. Water or Moisture Damage
Even a small amount of water inside your iPhone can damage the display.
6. Hardware Issues
If you recently dropped your iPhone or it suffered an impact, internal parts like the screen connector or display panel may be damaged.
7. Battery Issues
An old or faulty battery can affect overall performance, including screen responsiveness.
8 Simple Solutions to Fix a Glitching iPhone Screen
Let’s fix the glitching screen step-by-step with these tried and tested methods.
1. Restart Your iPhone
It sounds simple, but a restart can solve many temporary software glitches.
How to do it:
Press and hold the side button + volume button until the power off slider appears.
Slide to power off, then turn it on after 30 seconds.
2. Update iOS Software
Apple often fixes bugs in newer iOS updates.
Steps:
Go to Settings > General > Software Update
Download and install any available update
3. Remove Problematic Apps
Notice your screen glitching only when using a particular app? That app might be the problem.
What to do:
Uninstall or update the app from the App Store
Restart your iPhone to see if the issue goes away
4. Turn Off Auto Brightness
Auto brightness can sometimes cause flickering issues.
Steps:
Go to Settings > Accessibility > Display & Text Size
Turn off Auto-Brightness
5. Free Up Storage Space
Clear out unnecessary files, photos, or unused apps.
Tips:
Use iCloud to back up photos
Delete apps you don’t use
Clear Safari history and website data
6. Check for Moisture or Water
If you suspect water damage:
Turn off the iPhone immediately
Don’t charge it
Keep it in a dry area or a bag of uncooked rice for 24-48 hours
But be careful! Water damage needs expert help. If you’re near the lower hutt, it’s best to search for fix iPhone screen near me Lower Hutt and get professional service from Phonefixer.
7. Replace the Battery (if old)
An old battery can affect the screen’s performance.
Signs you need a new battery:
iPhone heats up fast
Battery drains quickly
iPhone shuts down randomly
You can check your battery health under Settings > Battery > Battery Health & Charging.
8. Visit a Phone Repair Expert
If none of the above solutions work, your iPhone may have hardware damage. Don’t try to open your iPhone yourself, it can cause more damage. Look for professional help by searching “fix iPhone screen near me Lower Hutt“ online. If you’re in Lower Hutt, Phonefixer offers reliable and quick repairs for glitching screens and other phone issues.
Pro Tips to Avoid iPhone Screen Glitches in the Future
Always keep your iOS updated.
Don’t overload your iPhone with too many apps.
Use a screen guard to prevent physical damage.
Avoid using your phone while charging.
Don’t expose your iPhone to heat, water, or strong magnets.
When Should You Visit Phonefixer?
If your iPhone screen:
Keeps flickering after restarting
Doesn’t respond to touch
Has lines or black spots
Has suffered a drop or water exposure
Then it’s time to get professional help.
What Makes Phonefixer the Most Trusted iPhone Repair Shop in Lower Hutt
Certified technicians
Fast service
Affordable prices
So, next time your screen glitches, don’t panic. Whether it’s a software bug or a hardware fault, Phonefixer has got your back. Save time and get peace of mind with expert help right around the corner.
Conclusion
A glitching iPhone screen is annoying, but it’s not the end of the iPhone. Try the 8 easy solutions mentioned above to see if you can fix it yourself. And if not, search fix iPhone screen near me Lower Hutt and bring your iPhone to Phonefixer for a professional check-up.
Stay calm, stay smart, and let the screen shine
0 notes